You should find an answer to your question below. For full instructions on how to install your panels please see our English Panelling Brochure. However, if you are stuck on anything, please just email your questions to team@scumblegoosie.com
You are very welcome to collect your order but please note the following!
- Orders can be placed via the website selecting the collect option at checkout. If you would prefer to pay by bank transfer we can send you an invoice with our bank details if you email all the details of the order and invoice address.
- Our warehouse is situated in Woodchester and is NOT the Thrupp address we used to use for some collections. We will advise you of the full details when we process your order.
- The warehouse does not have payment facilities and so all orders have to be paid for prior to collection. Please note we no longer take card payments over the phone.
- Please place your order at least one working day prior to collection to allow the warehouse time to pick. There are some occasions, for instance when we receive artic lorry size deliveries, when collection may not be possible but we will advise. The warehouse is only open on weekdays and collections need to be pre-arranged and between 10.30 and 4.00pm. Please check the website for holiday/stock check closures etc.
- If you are collecting Full Size Georgian please check that your vehicle is big enough and if you are organising a third party to collect on your behalf please advise them that these sheets need to be laid flat on the floor of a suitable van and prevented from moving around in transit as they do not come with any form of packaging. Each sheet weighs about 25kg so this also needs to be taken into consideration.
This will depend on four factors:
1. The condition of the walls: If the walls are uneven then they can be battened out first and then Georgian panelling applied (or the other types if you fix plasterboard or MDF to the battens first - ie dry lining). If the walls are smooth, flat and dry you can use any type of panelling direct to the surface.
2. The need to conceal services: If there are pipes or wiring to be concealed, use our Georgian panelling directly on studwork or any of the open backed types on plasterboard fitted to the studwork. Remember to allow access panels where necessary or required under building regs.
3. The proportions of the room/area and style considerations: Generally speaking, the finished room will look best if the top of the panelling run is either 1/3rd or 2/3rds of the height of the room, rather than dividing it in half. Other factors which may influence choice would include the height of fire surrounds, fitted cupboards and window sills, or the presence of existing dado rails. Style considerations would take into account the age of the property & its existing features (simple or ornate).
4. Suitability for the type of room/area:
-
- Georgian lends itself best to utility areas such as kitchens, bathrooms and cloakrooms - and circulation spaces such as passages, hallways, stairways and landings.
- Regency is better suited to larger spaces, where the larger pattern repeat can take advantage of the longer runs of wall.
- Victorian with its unique ability to be fitted to either dado or picture rail heights compliments spaces particularly well such as studies and offices
- Edwardian provides a slightly more contemporary feel than Victorian and works well in living rooms, dining rooms and other reception rooms.
Unlike our Georgian reeded panelling, which is made from solid sheets of MDF, the Open Backed types literally have perforations in the shape of rectangles or squares to create the panelled look.
Full instructions on how to install your panels can be found in our English Panelling Brochure.There is also guidance on setting out, particularly useful when using our Open Backed designs.
Smooth flat and dry walls? Our Georgian panelling can be glued directly to the wall using a panel adhesive such as Gripfill or No Nails. Run a bead about 20mm in from all 4 edges and then a generous zig zag across the rest. Allow roughly around one tube per Full Size sheet/per 3 Tall Panels/per 4 Short Panels. The Open Backed panelling only requires a thin film of adhesive for its application, so that a homogenous appearance is achieved. Use of PVA - applied with a mini roller - is one very effective method, but always check the suitability of the glue being used to the wall surface to which it is being applied. For all types of panelling, use a pin gun or panel pins to hold panelling in place, whilst the glue sets, and then remove or hammer home afterwards.
Rough walls? Fix battens to walls and then fix either Georgian direct to these, ensuring that all edges are fully supported, or dryline with plasterboard if using open backed types. On external walls insulation can be placed between the battens to enhance the thermal performance of the wall.
Residual damp? Ensure the cause of damp has been dealt with first, and then fix as described in 3 above.
Where services are to be concealed? Construct studwork using a minimum of 50mm x 50mm timber, ensuring that all panel edges are fully supported. Fix panels to the studwork created using panel adhesive - use screws over sections that may require future inspection access.
Ideally the skirting is fitted after panelling so that you do not lose any of the detail of the top of the skirting board but some skirtings do have a flat top and often customers will simply sit the panels on top of existing boards.
When fitting new skirtings the panelling should then be taken down to either just below the skirting line (packing out the rest at intervals using offcuts or framing strips) or, in the case of Georgian, almost down to the floor - it is always a good idea to leave a small gap here in kitchens and bathrooms just in case of a flooded floor!
Which type to use is a personal preference but we think a Torus profile goes well with Georgian and Ogee works well with the other designs. That said, in a cottage environment even a simple plain square-edged board can work really well with Georgian! We do not supply skirtings as they are readily available from local timber merchants/builders yards and in lengths that are not suitable for mail order.
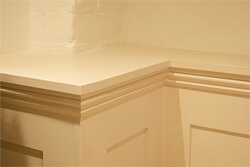
Dado rails can be used both to finish off the top of the panelling and the rebated types have the advantage of hiding rough cuts and minor height variations. Alternatively use our cornice to create a shelf detail.

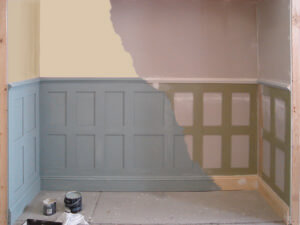
The panelling is ready to paint although it will benefit from a quick "wipe down" using medium grit sandpaper to take the sharpness off cut edges. Vacuum afterwards, especially the grooves of Georgian, to ensure all dust is removed. Always wear a mask when sanding any wood or MDF based product.
Apply a general purpose water-based primer and if there is any raising of the grain a very light sanding with fine grit paper should make the surface smooth again. This will only tend to occur on the machined edges (or grooves in the case of the Georgian) and will be minimal owing to the high quality of the MDF we use.
In bathrooms and kitchens we would always recommend finishing with a good quality eggshell as this tends to have a much higher water resistance than emulsion paints. It is a more traditional finish for woodwork in any case and will resist scuffs and knocks far better than matt emulsion.
When the primer is fully dry, apply a coat of water-based eggshell paint - if the paint is thick then it can be diluted with 10% water as this will help (particularly with the grooves of the Georgian).
Then, when dry, apply a second coat of eggshell. Some colours and makes of paint may require a further coat/s to obtain a really solid finish.
We do not have spray facilities on site but can organise pre-priming for large orders of 40+ Full Size Georgian sheets given sufficient notice (typically adds 4 weeks). Please contact us for a quote.
Please note that some suppliers pre-prime mdf due to the surface quality of the type of board they use. We insist on only using Medite Moisture Resistant MDF which is well known for having a very superior surface quality that is easy to prime by hand.
We would advise you to consult an electrician, but, by way of guidance, power points can be re-sited on solid panelling, by using standard plasterboard boxes - subject of course to the amount of play in the existing wiring.
With open backed panelling, in most cases the sockets will fall within an open part of the panel, but otherwise relocate as the existing wiring will allow or alternatively cut the panelling to suit.
Good advance planning is the key to avoiding and minimising any difficulties. It is advisable to lay the panels against the walls to see how they coincide with socket positions, as a simple adjustment here or there - with the size of one panel - can usually reduce, or even eliminate altogether, the need to re-locate a socket.
If you are dealing with existing radiators you may find it easiest to make slits in the panels to slide down behind the radiator and around the brackets.
If you are having to batten out the wall first with the intention of fitting the radiators after panelling we would recommend extra wide battens in the vicinity of the brackets to make the job even easier.
Again, careful planning and setting out is needed prior to fitting. In the case of the Georgian panelling - due to the vertical nature and small pattern repeat of the design - this is less of an issue, although care should still be taken when deciding where to place the cuts.
Where panelling, other than Georgian, is to be fitted, plan each length of wall separately. Because the panels can be reversed, or rotated, they can be laid out from each corner of each wall of the room to see what happens where they meet in the middle. The chances are that you will end up with an overlap. This can easily be dealt with by simply cutting down one of the panels which meet in the middle of the wall in order to create one larger (or smaller) panel in the centre of the run. Again we suggest that you download a copy of our Installation Guide (from main Menu) as we show some typical examples of how to set out the open backed types of panelling.
An alternative is to cut down the two panels on either end of the wall, so that all the panels in between are the same size. This will give you two identical but smaller panels, one at either end of the run, but again symmetry is maintained.
This method is also useful when dealing with very short runs of wall, of, say, a metre or less. The position of existing sockets may help to determine which of the above methods suits best.
All of our panels are made using Medite's Moisture Resistant MDF. This is a premium quality version of standard MDF developed specifically for areas such as kitchens and bathrooms. It also has a superior surface which makes it easier to paint as well as providing a better paint finish. In smaller bathrooms we would recommend our Georgian panelling since it does not have any ledges upon which water could sit. We would not recommend the use of any MDF based panelling within a shower cubicle itself and all walls must be free from damp. Newly plastered walls must be fully dry before installation.
Always install in accordance with good working practices. Ensure that the panels are used in such a way that there is no pooling of water resulting in the MDF being saturated for long periods of time. Where panels meet sanitaryware there should be a slope on the silicone seal away from, not back towards, the panels. Check too that the room has adequate ventilation in use.
See also the question above regarding painting panelling.
Exact quantities of panelling will depend on the actual dimensions of the rooms to be fitted, the number and size of openings, as well as the presence of projections such as chimney breasts etc..
However, If you are just running a single row of panels (eg Georgian Tall) we suggest adding up the total number of linear metres you are covering and dividing that by the width of the panel. So to do a 10m run with Georgian Tall, for example, it would be 10 divided by 0.6 which would work out at 17 panels.
(Please see the question below regarding Wastage allowance.)
If you intend to cover most or all of a wall with panelling such as Short Victorian or Jacobean it is probably easier to work out the area in square metres and divide that figure by the area of the panel you are using (eg Short Victorian = 0.48 sq m).
It is a good idea to do a very simple sketch of each wall prior to ordering, just as you would when measuring up for tiling in kitchens or bathrooms. Remember we are just an email away if you need a hand working out quantities!
The only design you can do this with is Georgian as it is a solid sheet. As long as the tiles are sound and clean then solvent based panel adhesives provide a very good bond with ceramics and this can save a lot of time and mess! Use a few panel pins or thin masonry nails, partially hammered in to coincide with the joints in the tiling, to hold the panels tight to the wall whilst the adhesive sets. These can then be carefully prised out the following day.
If you want your panelling to go up to a picture rail, or even full height to a cornice or ceiling itself, this is possible with our Short Victorian panelling or our Jacobean panelling. These products differ from all the others in as much that the sheets are open on two sides - in effect an 'F' shape - thereby allowing the sheets to be applied both vertically and horizontally as required. Ideal for studies and offices. This look can create an impressive effect in larger hallways and passages.
Our Georgian panelling can also be ordered as full size sheets in either the Wide or Standard Joint. These panels measure 1220mm wide x 2440mm high with the grooves running parallel to the long sides. The size of these panels makes them more difficult to transport and so we quote longer lead times for these. Bear in mind the size and weight (approx 24kg each) of these Full Size sheets when considering where they are going to be used - for example if they need to be taken upstairs. Please email us if you have a particularly difficult access as we may be able to suggest options.

There is no easy way to join the boards along the short sides (ie end to end) in such a way that the joins wont show. So the alternative is to add a moulding of some description to cover the join.
These are simply strips of MDF used for completing the end of runs of all of our Open Backed designs (Victorian, Edwardian, Regency and Jacobean). Normally, of course, each panel uses the next one to complete the fourth side of the squares/rectangles but at the end of each run a framing strip will be needed to complete the last panel. Similarly wherever a run is broken up by, say, a window or doorway you will find these strips very useful to complete the sides of any exposed rectangles and squares. Short Victorian, and both Jacobean designs, will need framing along the bottom edge as well (we call this the "starter rail"). Georgian, on the other hand, needs no framing strips although they are also very useful for packing out skirting boards (if applicable) and also to fill a small gap where a wall is just slightly wider than a fixed number of sheets.
We recommend having a read of the Installation Guide (download from main menu) as this gives some typical examples of where framing strips are useful to complete runs.
Panelling: As a general rule we suggest making an allowance of 5 - 10% for general cutting and wastage depending on the level of complexity of the job. Having a bit extra can be particularly beneficial when setting out the panels so that you have more say over how you arrange them on each wall to maximise the appearance, rather than being forced into using every available piece!
Dado Rails, Large Cornice and Picture Rail: With these larger mouldings it can be quite surprising just how much is lost when you cut the mitres to go around corners! So we suggest allowing 2.0m actual wall coverage per 2.4m length as a rule of thumb.
Smaller Mouldings: Same principle applies to the Bead Mouldings and Small Cornice as above but there is not the same degree of waste as there is with larger mouldings.
Framing Strips: These are used to close off the end of runs on our Open Backed designs (ie Edwardian, Victorian, Jacobean and Regency) and for "starter rails" on Jacobean and Small Victorian above skirting line to form the bottom rail. However they are also very useful wherever you have openings, for packing out skirtings (if applicable), and for general infill when the wall is just slightly wider than a fixed number of panels.
In terms of cost it is obviously best to not over-order by too much! However at the same time please bear in mind the cost of having to re-order one extra panel, dado rail or framing strip (including further delivery charges which on long lengths can be significant). You are welcome to return unused items in perfect condition but often the high cost of delivery makes this financially non viable if it's just a small quantity.
The short answer is no to both of these questions. We manufacture our panels on Computer Numerical Control (CNC) machinery that takes a long time to set up and so we produce 100's or even 1000's of panels on each run. We do not have cutting facilities at the warehouse so the panels can only be sent out in the designs and sizes that we show on the website. This is actually how we can make our products so much more affordable than traditional wood panelling.
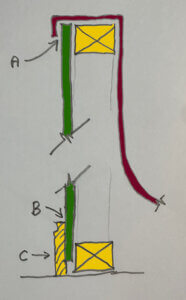
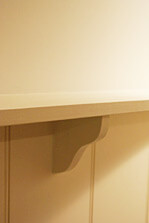
There may be instances where the use of a shelf may be a useful substitute for a dado rail. If the panelling is being boxed out for services then this will probably always be the case, as the shelf acts as an ideal 'lid' to close off the top of the framework - see first image. However, even where the panelling is applied directly to the wall or on battens, a shelf can be made using simple brackets to support it at suitable intervals - as in the second image below.
MDF is a wood composite material, primarily softwood, bonded with a synthetic resin, which is usually formaldehyde-based. Although it has been commercially available since the 1960s, its use has become significant only in the last decade or so.
The atmosphere created by machining MDF contains a mixture of wood dust (typically 85-100% softwood for MDF manufactured in Great Britain), free formaldehyde, dust particles onto which formaldehyde is absorbed and, potentially, the resin binder itself and its derivatives.
Following extensive tests, the Working Group on the Assessment of Toxic Chemicals (WATCH) found there to be no evidence that the ill-health effects - associated with exposure arising from the machining of MDF - are any different from those associated with similar exposure arising from machining other forms of wood.
The 'machining' process, therefore, is the only time that MDF poses any kind of health risk. The reality is that once the MDF is cut and finished with sealant or paint, it is no more harmful than a tomato (weight for weight, MDF and tomatoes have the same percentage of formaldehyde content).
Ensure good ventilation and use a good quality dust mask whenever cutting MDF. Ideally do all your cutting outside - this also has the added benefit that there is less clearing up afterwards.
Please note that we only use the finest MDF available - this is the Medite brand made in Southern Ireland - the moisture resistant variant is the best of its type available on the market. It is easier to paint than standard MDF, because it is less absorbent and provides a better finish.
MDF has a similar fire classification to timber (Euro Class D) so you may need to check with local building inspector about using it near heat sources. It will depend on the rating of the appliance in question and local authority guidance can vary on such matters. Some will suggest a sheet of fire resistant glass behind and/or above the appliance (this makes it easy to keep clean too so maybe some benefit here in the case of a cooker). For use in situations where spread of flame is an issue in areas designated as a protected corridor the use of intumescent paint can often be the answer, but again seek the advice of your local building inspector.
MDF is made by many companies around the world and comes in a very diverse range of specifications and therefore quality. Some makes are totally unsuitable for using in humid environments such as bathrooms and many have a poor surface quality (this is sometimes disguised by only offering the panel factory-primed).
For over 25 years we have used only one brand, Medite, to make our panelling with and we use their Moisture Resistant (MR) grade for everything as the surface quality is superior to the standard grade which helps with the decorating process even if you are not using it in a bathroom!
Manufactured in Ireland, Medite is Europe's premiere manufacturer of MDF with very high quality products across their range and particular consideration being paid to Environmental and Sustainability issues.